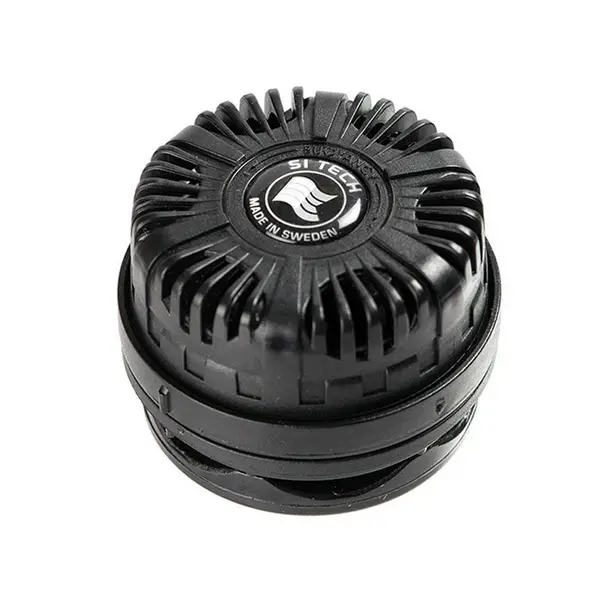
A drysuit should be dry, right? Yes it should, but if you end up with a leaking exhaust valve you may get wet. So how do you fix a leaking exhaust valve (dump valve) on a drysuit? Let’s take a look…
Drysuit exhaust valve leaking and how to easily fix it? You can easily fix a leaking drysuit exhaust valve by clicking the valve down by a couple of clicks. If this doesn’t work and the valve still leaks on your next dive, try taking it apart to flush it out with water in case there are any foreign objects like sand that are preventing the seal from closing.
The best way to do more diving is to book yourself on a scuba diving liveaboard. You can check the latest and best deals on liveaboards using the following:
The three ways to fix your leaking drysuit exhaust valve
There are actually three ways to fix your leaking exhaust valve on your drysuit. These are listed in order of ease, but also I suggest you try each one in turn before you try the next one. This is because the third option is expensive! Try each fix; then go diving in your drysuit and see if the leak has been fixed. If not, move on to the next fix…and so on.
Simply click the valve down a couple of clicks to stop the leakage, whilst still allowing for effortless air release.
Unscrew and take the exhaust valve apart to flush it out with water.
Replace the exhaust valve with a new non-leaking valve.
Let’s now take a look at each of the above fixes in more detail and consider any safely aspects of each tip.
1. Simply click the valve down a couple of clicks to stop the leakage
The easiest of all the above tips is to close the exhaust valve down by a couple of clicks. The best way to do this is to fully open the exhaust valve by turning it anticlockwise so it’s fully open. Then click it two clicks clockwise which will close it off a bit.
Be careful not to over tighten the exhaust valve as you still need it to release air on your ascent on your next dive. But see below about what happens if you close this too tightly and what to do about it.
This fix should work, especially if your suit is less than five years old. Unless you’ve somehow managed to get something Like sand inside the valve. If you have sand or another foreign object in your exhaust valve (or dump valve), you need to consider the next fix below.
Experiment with this tip on your next dive. Set the valve two clicks tighter and if it’s still leaks try one more click. However, be careful not to close the valve off too much, otherwise it won’t dump air like it should on your accent.
2. Unscrew exhaust valve and take it apart to flush it out with water
If the two clicks to tighten your exhaust valve doesn’t do the trick, you may need to take the valve apart.
This is very easy to do. All you need to do is to unscrew the back of the valve which is inside the drysuit. You should be able to do this with your hands rather than needing a special tool.
Once you’ve taken the back off, you’ll be able to pull the valve itself out from the drysuit.
To clean the valve it needs to be taken apart
Once you’ve done this, you’ll need to take the valve apart to be able to get to the rubber exhaust valve itself to clean it.
Be careful when you take it apart not to break the dump valve assembly, or else you’ll need to buy a new one. Also, you need to remember how it came apart so you can to put it back together afterwards.
To make sure you remember how it came apart you may want to take a video of the process, or take pictures of each step on your phone.
Each manufacturer’s exhaust valve will be slightly different, but the way they all work is essentially the same. If you watch the video below, this will give you some great tips on how this is done.
Clean the exhaust flapper with a Q-tip
Once you’ve taken your dump valve apart, the best way to clean the exhaust flapper is to first rinse it in water.
Then after that use a Q-tip to clean the seat of the exhaust valve. Then scrub the back of the valve flap too in order to make sure both surfaces are clean and free of any debris.
Now you can put the dump valve back together. Once you’ve put it back together, make sure the mechanism works okay before you put it back in your drysuit.
Clean the seat seat where the valve sits on the drysuit with silicone grease and a Q-tip
Now you’re ready to put it back into your drysuit. But before you do it’s best to clean the valve-seat where the valve sits in the suit.
To clean this use silicone grease and a fresh clean Q-tip. There should be a groove in the rubber where the exhaust valve sits. Make sure to use the silicone grease in this groove, but first clean it out of any debris.
Then put more of the silicone grease around the sealing surface of the drysuit too. Then do the same on the valve itself.
Once both surfaces are clean, remove any excess silicone with a clean end of the Q-tip and replace the exhaust valve back into the suit. Make sure you align the valve in the grove on the suit before you completely tighten the back-nut up.
I thought it a good idea to share a great video that demonstrates how an APEKS drysuit dump valve is taken out of a drysuit.
Remove and Disassemble APEKS Dump Valve for DrySuits How to disassemble and re-assemble an APEKS low profile exhaust valve or dump valve for drysuits. Also how to remove and install the valve. The valve on my Teknodiver drysuit leaked on a recent SCUBA dive so it’s time to give this valve a good cleaning.
3. Replace the exhaust valve with a new non-leaking valve
If on inspecting the exhaust valve flapper or the seat of the valve, you find it’s damaged in such a way to cause it to leak, you’ll need to replace the valve.
Also, if after cleaning the valve and putting back together and you’ve put it back in your suit, the valve is still leaking, you’ll also need to buy a new one.
To replace your old exhaust valve with a new valve requires you to remove the old valve first. This removal process is the same as in tip two above. You unscrew the locking nut on the inside of the suit to remove the valve. Take the old exhaust valve out comletely.
Take the new valve from the box, but before inserting it into your drysuit, make sure to clean the seat where the valve sits. Use silicone grease and a Q-tip to clean this.
Then put some of the silicone grease around the surface of the drysuit where the valve sits.
Carefully place the new valve into the suit and put the locking cap on the back. Before fully tightening, make sure the valve is sitting in the groove on the outside of the drysuit.
How do you know your exhaust valve on your drysuit is leaking?
If you’ve never experienced getting wet in a drysuit, there’s always a first time. It’s not nice as the water is cold as it enters the suit.
If the leak is really bad your undergarments will get soaked. Plus you’ll start to feel cold on your dive.
If it’s the exhaust valve that’s leaking, you’ll feel the water coming into the suit around where the valve is. Which in most cases is on the top of the arm of the shoulder.
Most drysuits also have a cuff exhaust valve too, and if it’s your cuff dump valve that’s leaking, you’re more likely to get a wet arm instead.
If you feel water coming into your drysuit around your wrist dump valve, keep your arm down below your shoulder height and the water should stay on your arm.
If you notice this on your dive, try tip one above and click the valve down by two clicks to see if the leaking stops.
What can cause your drysuit exhaust valve to leak?
There are a few things that can cause your drysuit exhaust valve to leak, which are as follows:
Debris like sand gets caught between the valve flapper and the seat of the valve. This will prevent a tight seal between the flapper and the valve seat, thereby letting water in.
The valve flapper gets damaged from the debris that caught between this and the valve seat. This damage means water can get under the valve flap as a tight seal is no longer possible
The valve flapper perishes as it gets old so that it no longer creates a tight seal.
What’s the best way to know if the leaking exhaust valve is fixed?
The best way to know if the leaking exhaust valve has been fixed is to go diving with your drysuit.
You’ll soon know if the problem hasn’t been fixed, as you’ll get wet again! If you don’t want to waste a dive in the sea, you could try your suit in a swimming pool first to see if it leaks before you go diving.
What happens if you close-off an exhaust valve too tightly?
Be careful not to close-off your exhaust valve too tightly. Otherwise you’ll stop the valve from letting air out as you ascend from your dive.
If the air is not able to escape from your suit as you ascend, you will end up doing a fast ascent, due to not be able to dump the air to reduce your buoyancy.
How much does a new exhaust valve cost for a drysuit?
If you end up having to replace your drysuit exhaust or dump valve this could end up costing between $60 to $100 depending on the make and manufacturer.
You may also like to read about how tight a drysuit should be. This article includes a drysuit fitting guide too and how to check whether it’s too tight before buying.
I hope you enjoyed this article about drysuit exhaust valve leaking
I’d love to hear from you. Tell us about your adventures of diving and snorkelling. Please use the comments section below. Please also share your photos. Either from your underwater cameras or videos from your waterproof go-pro’s!
If this article hasn’t answered all of your questions. If you have more questions either about snorkelling or scuba diving (or specifically about drysuit exhaust valve leaking), please comment below with your questions.
There will also be many more articles about scuba and scuba diving safety tips (and on snorkelling too) for you to read and learn about this fabulous sport.
Have fun and be safe!
How To Easily Fix A Leaking Exhaust Valve On A Drysuit (3 Easy Options)
Related Posts:
How Do You Vent Air From Your Drysuit While Underwater? You can set most drysuit exhaust valves to vent air automatically while underwater, but to do so the air in your drysuit needs to migrate to where the exhaust valve…
Should You Ever Wear A Wetsuit Under Drysuit? You could wear a wetsuit under a drysuit, but it's not the best way to keep you warm. So you should wear an under-suit that's designed for wearing under a…
Article written by Russell Bowyer who has been a scuba diver since diving on the Great Barrier Reef in Australia in 1989. After his first dive he trained as a BSAC diver in the UK. He attained his Diver Leader certification with BSAC. He then went on to become a scuba diving instructor, teaching others how to dive and was voted as Diving Officer and Treasurer for the Saffron Walden BSAC club too. Russell has dived all over the world, including the UK, on liveaboards in the Red Sea, the Caribbean, South Africa and the USA. Russell is experienced in all dive types, including drift diving, deep dives that involved decompression stops and recreational dives too.