27 scuba diving safety rules; tips to become a better and safer diver
I’ve been diving for over 30 years now and always followed scuba diving safety rules. During this time I’ve dived all around the world. I’ve been a diving instructor with the British Sub Aqua Club (BSCA) and a Diving Officer at one of the clubs where I was a member. In all that time I have focused on being a safe diver and on practising safe diving. I’d like you to do the same and be safe wherever you dive.
“Diving is a dangerous sport and means you must respect the rules to stay safe, which is what I taught my students when I was BSAC diving instructor. In the early days of diving it’s about remembering the top safety rules, which include never holding your breath and taking time with your ascents.”
The best way to do more diving and to practice these 27 rules of safe diving, is to book yourself on a scuba diving liveaboard. You can check the latest and best deals on liveaboards using the following window (opens in a new window):
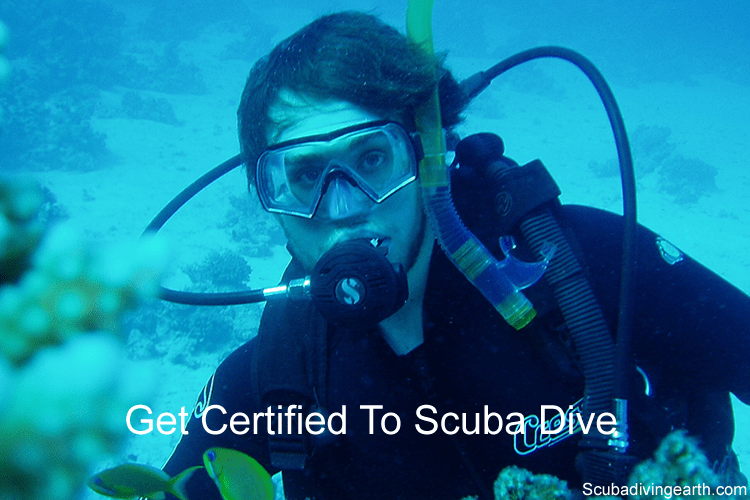
The scuba diving safety rules begin with getting yourself certified before you go diving.
Scuba diving is regarded as a dangerous sport (see the next diver safety tip). But it doesn’t need to be dangerous. If you get scuba diver certified and dive using safe diving practices, you’ll be just fine.
2. Strive for safety and make scuba diving a safe sport
Scuba diving is only classed as a dangerous sport because there are sometimes deaths or serious injuries that can result from diving. This applies to almost every sport, including the likes of sailing, horse riding, surf boarding and so on.
Diver training is there for a reason; it’s there to teach you how to dive safely and to stay safe.
Don’t make the mistake of doing the training, getting your scuba diver certification and then just forgetting it all. Keep all the safety training to mind each time you dive.
Always dive using safe diving practices.
3. Scuba diving safety rules means to never being afraid to abort a dive
Never ever be afraid to abort a dive. Your safety is paramount at the end of the day. If there’s the slightest doubt in your mind, or if something doesn’t feel right, don’t be afraid to question this feeling.
4. Never hold your breath when scuba diving
Holding your breath is dangerous. This is something you’ll learn on your diver training course, but it’s not always emphasised as much as it could be, in my opinion.
So this is one of my top safety tips for safe diving. Holding your breath can lead to a burst lung or an air embolism. The worst outcome of this is death. So never ever hold your breath when you are scuba diving.
To conserve air, there’s nothing wrong in slowing your breathing down. Use a trickle method of letting the air out of your lungs.
Where holding your breath becomes even more of a hazzard, is on your ascent. For example, between the depth of 10 metres (33 feet) and the surface, the pressure of the water halves.
But in this distance the volume of the air in your lungs doubles! You can imagine, if you hold your breath at 10 metres (33 feet), what would happen to your lungs by the time you reach the surface.
It would be a mess!
What most don’t understand about this concept, is that there’s no automatic nervous response for your body to breathe out in this situation. By the time a rupture happens, i.e. pain, it’s too late.
Unlike the urge to breathe after holding our breath for a while, where the oxygen is depleted from the air in your lungs. Or where our bodies provide signals to eat or drink. There’s no similar mechanism for breathing out. Nature didn’t design us to dive, this was not part of the evolutionary process.
When you ascend from a dive, it’s important to follow the slow ascent rules. There are different recommendations for this, but the speed I’d recommend is 9 metres (30 feet) per minute.
However, this isn’t always easy to monitor as you ascend from your dive, so I would firstly recommend you buy a dive computer. Dive computers have a built-in function to monitor your dive ascent. Simply follow the instructions on your dive computer and you’ll be just fine.
But always have a backup plan. Firstly, you’ll have a buddy who may have a dive computer, so if yours fails then rely on theirs.
If your buddy doesn’t have one and you don’t either, or if in the unlikely event they both fail, or if you get separated, the answer is to look for the tiniest bubbles that you create from your breathing. These are the size of Champagne bubbles. As long as you ascend at a slower rate to these, you’ll be okay.
The final tip is where you have an anchor line or another fixed line to ascend with, use this to control your ascent.
The best way to ascend at the correct rate using a fixed line is to use the ‘hand-over-hand’ technique. In other words, place your left hand on the rope in front of you.
Then place your right hand above your left hand and grab the rope with that hand. Repeat this with your left hand and then your right hand to slowly approach the surface.
Also see tip 22 on carrying a delayed surface marker buoy.
6. Always plan a safety stop on your dive even if decompression stops (deco stops) are not required
Scuba diving safety rules means that doing a safety stop at 6 metres (20 feet) on your ascent from a dive is super important. If you dive with a dive computer, this will tell you if you need to stop for decompression purposes, i.e. a deco stop is required.
Always do a 6 metre (20 foot) safety stop on every dive. This is in additional to any other deco stops that are required for the dive.
What about decompression stops if I don’t have a dive computer, or if it fails?
If you don’t have a dive computer or if the one you have fails, you need to know at what depth and for how long to deco-stop for (or not as the case may be). Diving with a buddy who may have a dive computer is one of your backups for this, but you may get separated or their computer may fail too.
You need to have a separate depth gauge and another timing device, i.e. a diver’s watch. You’ll be able to use these as your backup.
In any event, and even where your dive computer or the dive tables don’t show a deco-stop, do one anyway.
Do a safety stop at 6 metres (20 feet) for three minutes for every dive you do. This is in addition to any other safety stops that your dive computer or dive tables indicate.
7. Plan your dive and dive the plan
Always plan your dive on the surface. Plan how deep you’ll go, which way you will swim, how long the dive will be for (i.e. what’s your bottom time going to be), what to do should you get separated on the dive, and what safety stops you’ll be doing.
Whatever your dive plan is, dive that plan. If you do happen to get separated on the dive, do a quick check on the bottom and then surface. This procedure should be agreed at the surface, before you submerge.
If you’re not diving with a dive guide, make sure you’re equipped to find your way back to your exit point. Take a compass and know how to use it.
Run through the hand signals you’ll be using on the dive.
Also, make sure you know the area in which you are diving. Understand the state of the tides, will there be any currents and what’s the visibility likely to be. Plan for what type of dive area it is. How cold will the water be?
8. Wait 24 hours before you fly after scuba diving
Never fly straight after diving. If you use a dive computer, this will tell you when you are safe to fly. However, I always recommend being extra cautious on this one. Always leave at least 24 hours between your last dive and when you fly, even if you’re safe to fly in a shorter period according to your dive computer.
It’s always better to be safe, than to be sorry, when your life could be at risk! So always leave 24 hours between your last dive and when you fly.
So always make sure that your last day of your holiday or vacation is a dive-free day. Do something else on that day, but don’t dive.
9. Know your limitations when diving
Knowing your limitations with scuba diving is especially important at the early stages of learning. Don’t rush your learning, don’t rush to want to go as deep as you can and take your time.
It’s important to build your diving experience slowly (and your confidence). With each dive you do, you’re logging more experience, gaining more knowledge and building up your confidence bit by bit, stage by stage.
Scuba diving depth limits are set for a reason. The deeper you go, the pressure gets greater and the more problems that can occur. As you go deeper and the pressure on your body increases, you start to introduce other factors that influence your behaviour, like the possibility of getting nitrogen narcosis. Before you introduce additional risk factors, be good at diving at 15-20 metres (49-66 feet) first.
Get experience and be confident.
You want to have plenty of dives under your belt, before you progress to any of the next stages. Be patient, be safe and have fun.
10. Always have an alternative air source when you dive
I am pretty sure that all the top diving schools teach and insist on their students having an alternative air source.
So to understand why this is important, here’s my thoughts on the matter. In my 28 years of diving I’ve saved two divers by using my alternative air source. The first time was in the UK when my buddy’s first stage burst at around 18 metres (59 feet). The second time was diving Bonaire at around 20 metres (66 feet), when someone joined my buddy and I for a dive.
His air source stopped working and he gave me the ‘out-of-air’ signal.
Both times, all ended well. I took control in each situation. I stayed calm and applied my training. It helped that I was experienced and that I had confidence.
11. Check your air contents gauge regularly during the dive
It has been known for divers to run out of air. This is more common amongst novice and beginner divers.
Get used to checking your air on a regular basis. This way you’ll know how much air you are using and how long you have left to dive. Cross check the air that your buddy has too.
Always make sure you come to the surface with at least 50 Bar or 500 PSI (depending on the pressure gauge you use) left in your dive tank.
In the statistics studied by DAN, 41% of deaths were caused due to insufficient gas.
12. Don’t wait or ask for the alternative air source if you’ve run out of air
If your air runs out or your demand value (i.e. the bit that you breathe from) stops working, time is of the essence.
Let’s put that another way, you are underwater and you no longer have an air supply. And just to drive the point home. You’re not a fish; you’re not going to suddenly develop gills. And let’s say for argument sake you are at a depth of around 22 metres (72 feet).
The surface is a long way up and rushing to the surface is not a good thing to do in any event, as this may cause other problems in itself. Not to mention whether or not you’ll make it on what air you have left in your lungs.
Are you going to be polite and wait patiently for your buddy or for that matter the nearest diver to see you, and that you have a problem? Or are you going to grab their alternative air supply and save your own life?
All well and good if you’ve got their attention and they‘re quick off the mark and offer their alternative air supply to you. But what if they don’t. What if they’re an in-experienced diver, or worse still they panic.
Take control and take their alternative air supply. You can always discuss this afterwards on the surface. Your aim is to get air and to begin breathing again. And then to get to the surface quickly and calmly. But not too quickly, still follow the normal safe dive ascent rules.
When you do this,do in in a calm and decisive way. You don’t want to panic your buddy, but you do want to take control.
I suggest you agree this in your buddy check. I always say to my buddies: “Don’t ask just take my spare air supply; and here’s how you do it.”
13. Never take the regulator out of your buddy’s own mouth
It occurred to me when I wrote the last diver tip, that you may, just may, think about taking your buddy’s main air supply out of their mouth. Don’t do this, as you are putting them at risk and yourself at further risk.
14. Always use bold hand signals
Underwater the best form of communication is through hand signals. The most common signals that get used on all dives are the up and down thumb signal for ascending and descending. The okay signal for checking all is okay. And finally the air-check signal, to confirm how much air you have.
There are other signals that we hope never to use, which are the signals associated with an emergency.
The one I want to emphasis on this safe diving tip is the ‘out of air signal.’ Having experienced this situation with a dive buddy, and having experience his ‘less than convincing use of the out of air signal,’ I wanted to emphasise how important this is.
If you are out of air, or if your breathing apparatus is not working properly, get the attention of your buddy immediately. Once you have their attention, do the ‘out of air signal’ using big exaggerated and bold hand movements.
Don’t do what the buddy did on my dive in Bonaire, which was to look like he was tickling his Adams apple!
15. Never stray too far from your buddy for both your safety
This safe diving tip is an obvious lead on from the previous set of tips. It’s also a tip that, unless you’ve experience a situation involving an air supply problem, you don’t fully appreciate how important it is to stay within a reasonable swimming distance from your buddy.
I would suggest that this distance is no more than within a few fin strokes. Think about it. Your air supply has stopped. Your buddy is, let’s say 10 metres (33 feet) away. The surface is say 21 metres (69 feet) away.
You’re in a panic state, so your body will automatically start using up oxygen quicker than it usually does, but you’ve still got to swim 10 metres (33 feet) to an alternative air source.
The question is, would you make it?
Don’t forget, you only get to find out your air supply isn’t working properly when you breathe-in. And without wishing to state the obvious, if you’re about breathing in, it means you’ve just breathed out.
This means your lungs are empty. So good luck swimming 10 metres (33 feet) or anything more than a few fin strokes to your buddy with empty lungs. Or worse still, swimming the 21 metres (69 feet) to the surface (not really an option).
Please let me emphasise why I’m telling you all this. Firstly, I don’t want you to panic. I don’t want you to be afraid of scuba diving. I want you to enjoy it, but to enjoy it safely. Think carefully about what you do on each of your dives.
Please don’t also go to the other end of the scale on this safety tip. Don’t smother your dive buddy. That’s not cool and it can become annoying. Keep a safe distance, but not too far away.
16. A top scuba diving safety rule is to know where your buddy is at all times
The last scuba diving safety tip also leads to always be within eye sight of your dive buddy at all times during the dive. Not only that, know where your dive buddy is.
Many times I’ve dived with scuba divers who haven’t the first clue of where I am. They‘re either oblivious to almost anything that’s going on (sea life included). Or they are so wrapped up in what they are doing, that they haven’t a clue where I am.
Neither is good and neither is safe, should a situation arise. If you end up diving with this type of diver, don’t worry too much. Take control and you’ll just have to make sure you know where they are.
Even if they’ve not got a clue. You keep the safe distance between you and them. You do the regular checks to confirm where they are and, if they stray too far, never worry about swimming over and getting their attention.
I guarantee that should a problem develop with their air supply, they’ll soon want to know where you are. But at least if this does happen, where you’ve followed best practice and been a good dive buddy and maintained that safe distance, you’ll be there to help them.
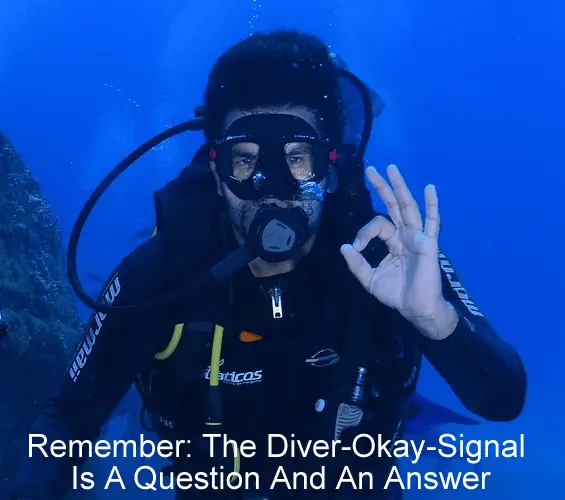
17. Remembering that the diver-okay-signal is a question and an answer
The okay signal in scuba diving is probably the most commonly used signal between divers across the world. The signal is used at every stage of a dive.
But it’s important to remember that if someone shows you the okay signal, they are asking you a question; i.e. “are you okay?” As with any question, it’s not only polite to reply, but in diving it’s always good practice to reply.
So if any diver looks your way and shows you the okay signal, always reply. If in return, you ask someone if they’re okay with the diver’s okay signal and they don’t reply, keep showing the signal until you get a response, either positive or negative.
If you don’t get a response back, investigate further.
18. Look for signals in your buddy
Be an ‘aware diver.’ Be a caring diver and watch out for your dive buddy, or for that matter watch out for all divers in your dive group.
Look for signs that could indicate that either someone is in difficulty, that their not comfortable or that they are having trouble in some way.
If in doubt, get their attention and show them the okay signal. Wait for their response. If they reply with the okay signal, but their face or eyes tell another story, make sure they truly are okay.
I’m not saying to become the diver master on every dive and not to enjoy your dive. What I am saying is just to be aware of what’s going on around you. You’ll become a much better scuba diver for it.
19. Clearing your ears and diving with a cold or a sinus infection
On your descent you’ll need to clear your ears or equalise the pressure between the outer ear and the middle ear.
As you descend the pressure of the water at depth increases the pressure of the air in the outer ear. The air pressure in the middle ear (Tympanic Cavity) needs to be equalised to the same pressure. This pressure differential is noticed by noticeable pressure on the ear drum and in some cases will cause pain.
Failing to do this on your descent, can cause the ear drum to rupture.
The pressure equalisation between the outer and middle ears is achieved by pinching the nose and then blowing through your nose. This action forces your Eustachian tube open and allows the pressure in the middle ear to equal the pressure in your month and in the outer ear.
Sometimes you can hold your nose and swallow, as this action may be enough to also clear any blockage in your Eustachian tube. Another technique that works is carrying out an action with your mouth as if you are doing a voluntary yawn.
Never scuba dive with a cold or sinus infection
It’s never a good idea to dive when you have a cold or a sinus infection. When you have a cold, your Eustachian tube gets blocked, making it more difficult or impossible to clear your ears. If you don’t manage to clear your ears, the pain would be unbearable if you continued to descend. Which could ultimately result in a ruptured ear drum.
WARNING: Never scuba dive when you’re using decongestants, as these may clear your ears for the descent, but you still have to return to the surface. Your Eustachian tube may get blocked during the dive.
What about using decongestants when you scuba dive?
This is not a good idea, because whilst your ears and the Eustachian tube maybe clear for your descent, you still have to ascend too.
During the course of your dive, the effects of the decongestant may wear off and your Eustachian tube may become blocked. However, you still have to return to the surface. If you don’t manage to clear your ears on your return to the surface, you may damage your ear drums.
So I’d recommend not diving using a decongestant.
20. Practice recovering your regulator
It is possible for your regulator (the mouth piece you breathe from) to be knocked from your mouth. This could happen by the accidental swipe of someone else’s fin.
This isn’t usually a problem as it’s easy to recover your regulator, and you’re taught this technique when you learn to scuba dive.
As with any skill, if you don’t practice it or don’t use for a long time, you forget how to do it and get out of practice. I recommend you practice this skill, just in case it should happen to you, so that you’re prepared.
21. Buddy checks just before you dive
The number of times that I’m on dive boats and see that divers just don’t do buddy checks. It’s really worrying and I think it’s complacency kicking in. Save someone from an air supply problem and you understand the need for buddy checks. Experience a real situation under the water and this tends to focus your mind.
Buddy checks are important for two reasons. The first reason for performing a check is to confirm that all your equipment, and your buddy’s equipment, is in good working order. Plus that you both have your air switched on.
The second and sometimes forgotten reason for a buddy check is about getting familiar with your buddy’s kit. As well as them getting familiar with your kit too. For example, where each of your alternative air sources are located, does it work and how easy is it to get to?
22. Use the ABC for a buddy check
As already discussed in the point above, doing buddy checks is an important part of safety before you begin your dive.
Using the ABC method helps you to remember what to check before the dive.
‘A’ is for air – check and demonstrate this first
Check that your air is okay and switch on.
Check that your air supply is working properly.
When you test your air, check your air gauge for any fluctuations. Show your buddy the gauge to confirm it’s okay. Confirm out-loud what you are demonstrating.
Does your air ‘taste’ okay. Openly confirm this out-loud.
Carry out the same tests on your main regulator and on your alternative air supply (your octopus).
This confirm good working operation of both. But for the alternative air supply, it shows your buddy that you have one and where it is on your kit.
Confirm to your dive buddy that you are happy for them to take it in an emergency; without them asking for it.
Demonstrate how to detach it.
‘B’ is for buoyancy – check and demonstrate this next
Check that your ‘air-in’ or direct feeds all work on your buoyancy control device (BCD) or stab jacket. (Check the same on your dry suit if it’s a dry suit dive).
Make sure the air feeds are connected properly. (This includes your dry suit feeds where applicable).
Confirm to your buddy where all the dumps valves are for an emergency. (This applies for your BCD and for your dry suit if applicable)
For dry suit diving, confirm which buoyancy method you’ll be using, i.e. either your BCD (Stab jacket) or your dry suit or a bit of both.
‘C’ is for clips and releases – check and demonstrate this last
That’s means it’s always down to me to check that’s all in working order and maintained correctly.
Where you buy your own equipment, always make sure you buy good quality kit. It doesn’t always have to be the most expensive and it does depend on which bit of kit you’re looking at. For example, when it comes to buying regulators I wouldn’t suggest cutting any corners or buying cheap, as these are your underwater life-support system.
If your demand valve or your regulators stop working, you’ll be in trouble. You also want to make sure these are serviced and checked regularly, which will depend on how much you use them.
After each dive, always rinse your kit in fresh water and store it in a safe dry place.
If you don’t have your own scuba gear and always use rented kit, or if you do have your own equipment and a rent it when you travel, most dive centres will hire out well maintained kit. But before you do dive with their equipment, or if you have any doubts, check first.
24. Carry a delayed surface marker buoy (SMB)
There are not many dives that I do when I don’t carry with my my delayed surface marker buoy (delayed SMB).
I do this for two reasons. The first is that it’s useful to send to the surface for the boat’s skipper to know you are ready to ascend. It’s a marker for them to see where you are. This is particularly helpful if there’s a swell running, as the marker buoy is easier to see for the skipper than for him to see your head.
The second reason why it’s a good idea to have a delayed SMB, is to use it for safe ascents. This is particularly useful on deeper dives, dives where the visibility is poor, and on dives where currents exist. You may have completed your dive on a wreck, the position of which is known by the skipper, but as you ascend, and even with the slightest of currents, you’ll drift away from that position.
By sending our marker buoy to the surface, before you begin your ascent, the skipper will see you, and be able to follow where you drift.
If for whatever reason your usual method of doing a safe ascent fails, e.g. your computer has failed, and where either you’ve become separate from your buddy, or they don’t have a dive computer, you can use your delayed SMB as a line to ascend with.
By reeling in the line slowly, your ascent will be within the safety limits. You’ll be able to check this by slowly following the champagne sized air bubbles on your way up.
25. Fitness to dive
Scuba diving is a physical sport. This is not only because its a physical activity, that is you are jumping to the water, swimming on the bottom, getting back on to boats and so on. But it’s also physical due to the water pressures.
You need to be medically fit to dive, as certain conditions can cause problems at depth. If you have any doubts, question or concerns about any health issue, always consult your doctor beforehand.
When you learn to dive and when you dive with any organised dive, you have to sign a fitness and health waiver. It is your responsibility to confirm your fitness to dive. But you’re not a doctor. If in doubt ask.
26. Staying fit and being a confident swimmer
As scuba diving is a physical sport, it’s a good idea to stay in shape. This will not only help with keeping you out of trouble, but it will help you to improve your air consumption too.
Also, as it’s a sport that is safer where the people participating are confident in their abilities, being a competent and confident swimmer will help in this regard too.
To train to be a scuba diver, you must first be able to swim for 200 metres (656 feet), but instead of doing the bear minimum, why not improve on this and be a better and more confident swimmer.
Also,when you’re on holiday or vacationing, snorkel where and when you can. This will build up your confidence and its great fun to do.
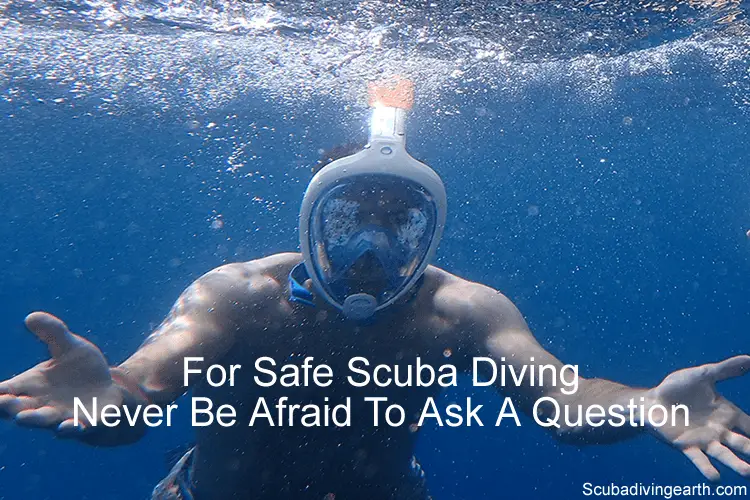
27. Never be afraid to ask a question
There are many who don’t like to ask question. This is mostly a confidence issue.
If at any stage during your diver training, or on an organised dive you are unsure or your don’t know something, always, always ask.
It’s better to know the answer to your question. Always remember there are never any stupid questions. If you don’t know it, you don’t know it. But by asking the question, you will.
Is it dangerous to scuba dive?
The short answer is yes, as it’s a sport that is classified as dangerous. However, if you get yourself certified, follow safe diving practices (which includes the guidance in this article), these’s no need for it to be dangerous at all.
However, if you attempt to dive without the correct training, if you dive having not dived for a long time without a suitable refresher, dive with equipment that’s not regularly serviced or maintained and you don’t plan your dives and don’t carry out proper buddy checks, then scuba diving is very dangerous!
Is it necessary to know swimming for scuba diving?
It’s so important to learn how to swim before you even attempt to scuba dive.
You must have respect for water, as things can go wrong even on the surface and with a competent swimmer. So to consider diving under the water not knowing how to swim, would be complete madness.
If you’re contemplating scuba diving without first knowing how to swim, please read this article first Scuba diving tips for non swimmers.
It would be extremely dangerous to go scuba diving, not knowing how to swim beforehand.
Can you go scuba diving by yourself?
Diving on your own would not be following safe diving practice.
All scuba diving training schools teach the buddy diving principle. Which is to always dive in buddy pairs. Even where you dive in a group, you are always paired up in buddy pairs.
Diving as a pair starts at the surface with your buddy check. As already explained in safety tip 20 above, the buddy check is for each of you to become familiar with each others kit and to confirm that it’s all in working order.
Once on the dive, you are each looking out for the other, so that if something should go wrong with your own kit or your buddy’s kit, you’ll be there for each other.
However, if you’re on your own and something goes drastically wrong…you’re on you’re own!
I recently read this article on the BSAC website. It’s likley that scuba diver concerned would not be alive today if his buddies were not nearby. In this case it was a trio dive, but the principle still applies. The incident also highlights how important it is to stay within eyesight of your dive buddy. Taking control: What happened to the other guy?
Why do divers do a safety stop?
Understanding safety stops for scuba divers are an essential part of scuba diver training. There are some diver training schools that teach safety stops as mandatory stops on your way to the surface after a dive.
Safety stops are designed to allow the gases (which in this case is nitrogen) that have been absorbed in your body tissues during the course of the dive, to be released. All scuba diver tables and dive computers are based on certain algorithms, and as such apply a blanket rule to everyone.
However, everyone is different. People are different weights, at different levels of hydration and are physiologically different in many other aspects. So it’s therefore always prudent to carry out this safety stop.
Safety stops are different to ‘Deco-stops‘, which are required decompression stops that form a part of the dive profile.
Deco stops are required where the dive time has taken the diver into a decompression dive profile. This means that deco stops must be done at certain depths on the ascent, to avoid getting the bends or decompression sickness.
As explained in safety tip 7, it’s also recommended to carry out an extra safety stop in any event.
I hope you enjoyed this article about scuba diving safety rules
I’d love to hear from you. Tell us about your adventures of diving and snorkeling, in the comments below. Please also share your photos. Either from your underwater cameras or videos from your waterproof gopro’s!
If this article hasn’t answered all of your questions. If you have more questions either about snorkeling or scuba diving (or specifically scuba about diving safety rules), please comment below with your questions.
There will also be many more articles about scuba diving (and on snorkeling) for you to read and learn about this fabulous sport.
Have fun and be safe!
27 Rules For Safe Scuba Diving (Safety Tips To Become a Better Diver)
Related Posts:
About Russell Bowyer scuba diving expert in DUI dry suit before a scuba dive in the UK My name is Russell, and I'm the diver behind Scuba Diving Earth. I have…
What Is The Golden Rule Of Scuba Diving? The golden rule of scuba diving is to always remember to never hold your breath while ascending, because as you ascend to the surface, the pressure around you decreases and…
What Is The Rule Of Six In Diving? The "rule of six" in diving is a guideline to help prevent decompression sickness, also known as "the bends." It is a safety rule used to help divers plan their…
Article written by Russell Bowyer who has been a scuba diver since diving on the Great Barrier Reef in Australia in 1989. After his first dive he trained as a BSAC diver in the UK. He attained his Diver Leader certification with BSAC. He then went on to become a scuba diving instructor, teaching others how to dive and was voted as Diving Officer and Treasurer for the Saffron Walden BSAC club too. Russell has dived all over the world, including the UK, on liveaboards in the Red Sea, the Caribbean, South Africa and the USA. Russell is experienced in all dive types, including drift diving, deep dives that involved decompression stops and recreational dives too.
12 thoughts on “27 Rules For Safe Scuba Diving (Safety Tips To Become a Better Diver)”
That’s a good point to pickup on. It’s so important in life to not be afraid to say no. Scuba diving is about enjoying yourself, so the last thing you want to do is to go on a dive you’re not entirely happy about. Thank you for taking the time to comment.
Well written article with plenty of great suggestions. I was just looking for scuba diving into to share with a buddy interested in trying out scuba diving. I will definitely share the page. Thanks!
There is just a ton of great diving tips in your article. I think using the buddy system would give me a better peace of mind. Thanks for writing such a detailed article and I will definitely share this page.
Very nice tips and experience is very evident…just one thing, nature did not make anything of us, it was God who made us so wonderful in his caring love and because of same love he died for us to take away our sins and tasted hell on behalf of us. Please accept Lord Jesus to have died for our sins and risen again in 3 days and apologize for sins, so that you can be a part of God’s family for eternity.


good post thanks for sharing
You are welcome and thank you for your comment and engaging
Nice post about becoming a better scuba diver, thank you so much for sharing. it is very useful information.
You’ve welcome, thank you for taking the time to comment
I like how you said to never ever be afraid to abort a dive. I am going scuba diving this month. Thanks for the tips on how to scuba dive safely.
That’s a good point to pickup on. It’s so important in life to not be afraid to say no. Scuba diving is about enjoying yourself, so the last thing you want to do is to go on a dive you’re not entirely happy about. Thank you for taking the time to comment.
Well written article with plenty of great suggestions. I was just looking for scuba diving into to share with a buddy interested in trying out scuba diving. I will definitely share the page. Thanks!
Thank you for the comment and I’m grateful for the share too
There is just a ton of great diving tips in your article. I think using the buddy system would give me a better peace of mind. Thanks for writing such a detailed article and I will definitely share this page.
You are welcome and thank you for taking the time to comment on my post
Very nice tips and experience is very evident…just one thing, nature did not make anything of us, it was God who made us so wonderful in his caring love and because of same love he died for us to take away our sins and tasted hell on behalf of us. Please accept Lord Jesus to have died for our sins and risen again in 3 days and apologize for sins, so that you can be a part of God’s family for eternity.
God Bless!
Hello Satish, thank you for your comment and kind words, on your other comment I’ve ask if you are a scuba diver